Introduction: Contact Angle, it refers to the tangent line of gas-liquid interface at the intersection of gas, liquid and solid phases. The tangent angle θ between the tangent line on liquid side and the solid-liquid boundary.
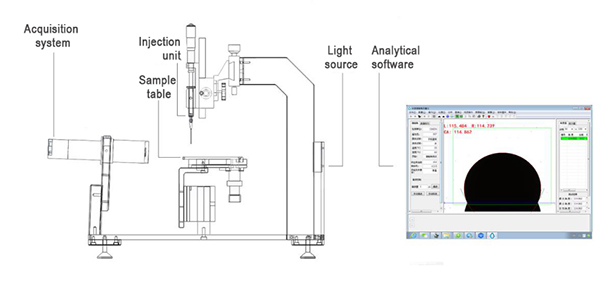
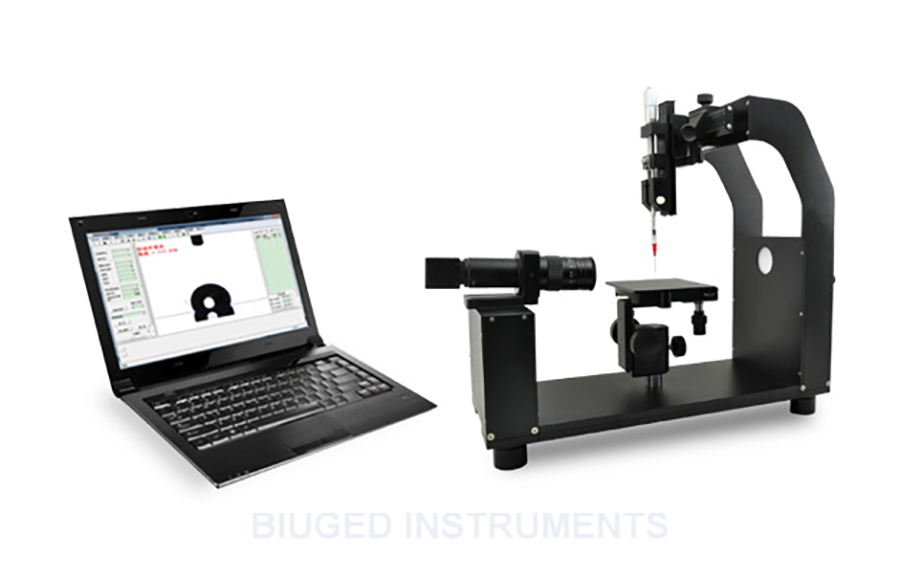
BGD 190 Contact Angle Measuring Instrument is mainly composed of five parts: light source, injection unit, sample table, acquisition system and analysis software. The equipment adopts the principle of optical imaging and measures the following parameters by image profile analysis.
◆ The wetting behavior of liquid on solid surface, such as spreading, infiltration, absorption, etc. The static contact angle is measured by sessile drop method.
◆ Measurement of advancing contact angle(ACA), receding contact angle(RCA), contact angle lag, rolling angle(tilt platform is required) and dynamic contact angle of material on solid surface.
◆ Continuous real-time study and process record of absorbing materials, analysis of contact angle variation curve with time.
◆ Contact angle measurements of various special materials, such as powders, curved surfaces, super hydrophobic/ super hydrophilic samples.
◆ Test of the contact angle of the material immersed in the liquid by the attachment drop method(quartz sample cell is required).
◆ Measurement of surface tension, polarity and dispersion components of various liquid meters by pendant drop method.
◆ Count surface free energy and analysis of polar dispersion components.
◆ Analyze the adhesion of liquid on solid surface, evaluate the uniformity and cleanliness of solid surface, etc.

Features
◆ Conform to standards: ASTM D724-99(R-2003), ASTM D5946-2004, ISO15989, etc
◆ The host adopts the high-strength aviation aluminum alloy structure to be matched with the modular design concept and self-developed integrated chip circuit control, which can be comparable to similar international top brands.
◆ Adopt industrial dense adjustable LED cold light source system (life span more than 25000 hours). The uniform light emission ensures clearer imaging and avoids droplet volatilization caused by additional heat.
◆ The injection unit adopts micro manual button injection, which is stable and accurate.
◆ The three-dimensional manual fine tuning platform is adopted, which is flexible in operation and accurate in positioning. The sample table can be customized according to the actual sample size.

◆ Adopt high-performance SONY industrial chip original imported from Japan, and 0.7~4.5 times high definition industrial grade continuous ploidy microscope imported from Germany(Max. 60 frames) with 2000W pixels, which can ensure the authenticity of images and obtain the best imaging
◆ USB2.0 standard interface is adopted, with fast data transmission speed and high compatibility.
◆ The first contact angle measurement calibration sample imported from Germany is provided in China to ensure the accuracy of the instrument. The angle calibration standard sheet is 3°/5°/8°, 60°/90°/120°, 115°(optional).
◆ The design of the acquisition system is flexible, suitable for most of the measurement environment, and simple to deal with a variety of complex sample surface measurement.
◆ Has the most advanced contact angle analysis method in the world, which can meet the accurate fitting of all kinds of droplet imaging, including our company's unique differential ellipse and differential circle special liquid imaging fitting method.
◆ Using the international leading calculation method, the software has realized automatic fitting to avoid the error caused by human operation.
◆ With the function of fast fitting of bilateral contact angle measurement, it can comprehensively analyze the surface wetting performance of liquid and solid, and more accurately analyze the actual wetting situation of the surface.
◆ Dynamic shooting, video fast test data, can continuously record the change of test contact angle, and then automatically batch fitting by the software.
◆ The most advanced contact angle measurement and analysis software in China is automatic fitting method (one-button automatic fitting, no artificial error), including: Circle method, Ellipse/Oblique ellipse, LY, Differential circle/Differential ellipse; Dynamic contact angle fitting (batch fitting of multiple images) includes: Wettability, Video analysis; Surface energy; Adhesion work.
◆ The software automatically generates reports, which cover various data reports such as Word form, Excel form and Spectrograms, etc.
◆ A variety of accessories can be selected to expand other functions and applications.

Main Technical Parameters
■ Contact angle measurement range: 0~180°
■ Contact angle resolution measurement accuracy: ±0.001°
■ Testing accuracy of contact angle: ±1°
■ Surface free energy: Zisman, OWRK, WU, WU 2, Fowkes, Antonow, Berthelot, EOS, Adhesion work, Wet work, Spreading coefficient.
■ Dynamic contact angle fitting: batch screenshot fitting, video continuous automatic fitting and automatic online real-time fitting.
■ Surface/interface tension test: Pendant Drop method(real-time full-automatic dynamic surface tension test)
■ Droplet state test: Pendant Drop, Sessile Drop(2/3 state), Captive Bubble, Sessile Drop, Sessile Needle
■ Advancing contact angle & receding contact angle: method of increase and reduce the drop volume automatically measures the change of advancing angle and receding angle.
■ Spectrogram shows: left contact angle, right contact angle and average contact angle
■ Injection unit: special precision syringe with capacity of 500μL, hand-operated rotary liquid inlet(the drop accuracy can reach 0.1μL), the movement range of the injection unit is 50mm up and down, 50mm left and right.
■ Acquisition system adjustment: front and rear 60mm, adjustable viewing angle
■ Working table size: 120mm×150mm
■ Max. width of sample: 200mm (unlimited length)
■ Adjustable range of working table movement(manual, precision 0.1mm): forward and rear stroke 60mm, left and right stroke 35mm, up and down stroke 80mm
■ Standard configuration: digital camera CMOS, high-definition constant-magnification light tube, video cable, dongle, supporting software, power cord, micro-sampler, round horizontal ball, one each; stainless steel needle(equipped with micro-injector), 0.51mm plastic needle(equipped with 1ml syringe), 1.6mm plastic tension needle(equipped with 1ml syringe), and five hex wrenches respectively; ten 1ml syringes
■ Optional Accessories: thin film fixture, standard film, sample cell, hydrophobic treatment solution, quantitative injection pump, temperature control platform, vacuum platform, electrostatic fan, manual tilt platform, micro injection pump, needle syringe, high-speed camera
■ Ordering Information: BGD 190----Contact Angle Measuring Instrument
Introduction Video
Operation Video
Biuged Precise Instruments (Guangzhou) Co.,Ltd
Add:NO.15, Fuzhong Rd., Zhongxin Town,
Zengcheng District, Guangzhou.China
Tel:+86-20-32955999;+86-20-32955820
Fax:+86-20-32955819
E-mail:jack@biuged.com
Website: http://www.biuged.com
Biuged Instruments Co.,Ltd.
Add:RM.310, NO.1, Sicheng Rd.,
Tianhe District, Guangzhou.China
Tel:+86-20-82169666
Fax:+86-20-32955818
E-mail:jack@biuged.com
Biuged Precise Instruments (Shanghai) Co.,Ltd
Add:Room 906, 9th Floor, Zhongcai Industrial Park, No.1111
Zhu Feng Road, Qingpu District, Shanghai, China
Tel:+86-21-59240298
Fax:+86-21-59249719
E-mail:xjx@biuged.com
Biuged Laboratory Instruments (Guangzhou) Co., Ltd. Guangdong ICP record number:11044672


.png)

